How to Check the Accuracy of a Thermometer [complete guide]
We all know that barbecue thermometers have a difficult life. They are routinely dropped, exposed to extreme conditions, and rained on as well. So, you may be wondering how to check the accuracy of a thermometer. After all, there is no point using one if it just gives you a random temperature!!
Luckily, there are many simple tests that you can perform at home to check the accuracy of a thermometer and by doing this you should be able to save some cash on replacement probes by calibrating the thermometer yourself.
Why should you test your barbecue thermometers regularly?
It is important you check the accuracy of your thermometers at least once a year. If you have recently dropped or mistreated your thermometer, it is better to do a quick test right away. If not, you are at the risk of relying on inaccurate temperature readings.
In such a circumstance, you might take the meat off the grill before it’s done and have an undercooked barbecue. You really don’t want to be responsible for the illness that could follow!
The good news is that if your digital thermometer is in one piece, a simple calibration will get it working like a charm again.
Check Your Thermometer Specifications
You need to get yourself familiar with the specs of your thermometer provided by the manufacturer. My Thermoworks ChefAlarm came with a certificate of calibration which I thought was great. Thermoworks is a manufacturer of some of the best thermometers and outlines all the details in its manuals.
You don’t need to calibrate the thermometer if the reading comes back within the range of accuracy. It also depends on the quality of your device and its range. If your thermometer is accurate but your requirements have changed, you can still do the calibration.
How to check the accuracy of a thermometer
The best way to check the accuracy of a thermometer is to undertake an ice bath test, or a boiling water test. In some cases, performing just one of these tests will do the trick. Some manufacturers recommend that you do both tests to ensure the accuracy of your device.
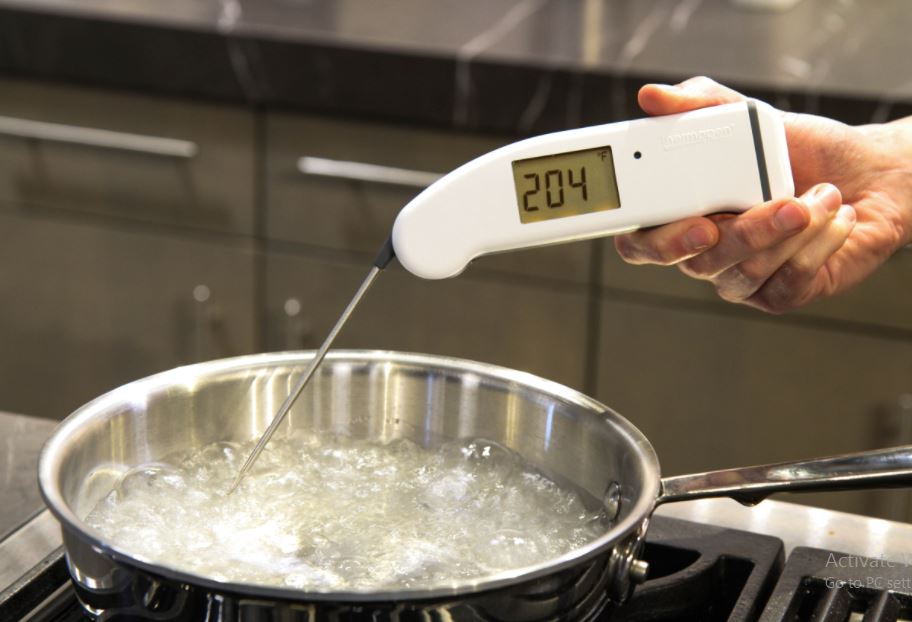
1. The Boiling Water Test
It is a straightforward test, water boils at 212° Fahrenheit. You need to just dip the thermometer into boiling water and check the reading to find out your thermometer accuracy. But, there are some factors you should consider before performing this test, otherwise, you will do the test and calibration all wrong.
- Water boiling temperature is different in different atmospheres. Take into consideration all these things before performing the test.
- Hard water will boil at 1 – 20°F higher than soft water.
- Use a wide-mouthed pot when performing this test as the water heated in a tall, narrow pot will boil at 10°F higher.
Now that you have made all these initial calculations, it is time to proceed with the test.
- Pour 4 inches of water into a wide-mouthed pot.
- Bring the water to a vigorous boil.
- Insert the thermometer probe about 2 inches into the water. Stir the water probe gently for about 10 seconds and note the reading.
If the thermometer reading falls inside the accuracy range, you don’t need to calibrate the thermometer.
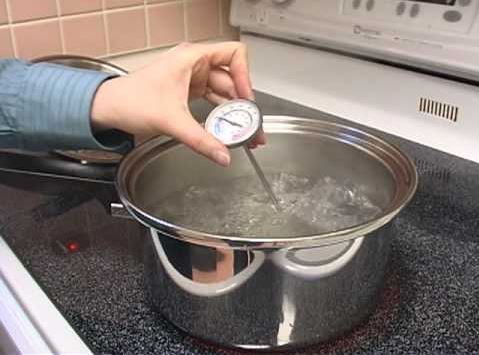
2. The Ice Bath Test
This test is even more straightforward than the water bath test. It is very important to note when preparing an ice bath that a cup of water with some ice cubes floating at the top is not an ice bath. Here’s how you can perform an ice bath test…
- Fill a tall glass with ice cubes right to the top. It is better to use crushed ice.
- Fill the gaps between the ice with chilled water.
- Gently stir for 20 seconds to get the temperature even.
- Place the thermometer probe about 2 inches into the water.
- Gently stir the water with the thermometer probe for about 20 seconds.
- Take the reading.
Try not to let the probe touch the sides of the glass or sit at the bottom of the cup as it will affect the reading. Don’t let the ice melt as the results will no longer be accurate.
How to calibrate an inaccurate thermometer?
The first step is always to find out the specifications of the thermometer you have. If you are done with testing and have the results, it is time to calibrate.
Most thermometers are easily calibrated just by following the manufacturer’s guidelines. It is always preferable to keep a record of calibrations. This will help you keep track of how often you have needed to calibrate, and how far off the readings were when you did. If your thermometer is often calibrated, you are ready to throw it out. You can address this issue by replacing the probe.
How to calibrate some popular thermometers
Here are some calibration methods that are given for popular thermometers. Let’s check them out…
Calibrate Thermoworks ChefAlarm
- Turn your thermometer over so the backside is facing you and the probe flips out.
- Take off the manufacturer’s label.
- The screw on the right is to calibrate to zero while the left one is for calibrating the boiling point.
- Flip out the probe once again.
Ice Water Calibration
- Dip the tip of your ChefAlarm thermometer into the ice water and gently stir it. Don’t let the probe touch the side of the container that holds water.
- Once the reading is noted, carefully turn the thermometer in one hand to gain access of calibration screws.
- Adjust the calibration screws with a small screwdriver until reads 32° Now, take the probe out of the water.
Boiling Water Calibration
- Dip the tip of the probe into the boiling water without any contact with the side of the pan.
- Once the reading is established, carefully turn the thermometer around to have access to the calibration screws.
- Adjust the screw on the left side so that it reads 212°
Recheck the thermometer after every test and calibration. Once everything is properly adjusted, replace the cover and start using the thermometer again.
Smoke Calibration
The Thermoworks back the Smoke Thermometer enough to state you shouldn’t ever really need to calibrate it. You can use the calibration function on the unit to fine-tune each probe on the thermometer to get more accurate readings.
The Smoke Thermometer comes new from the factory with great accuracy. If your thermometer readings are showing a large difference, the calibration of it won’t be the solution and you need to purchase a new one. The best way to calibrate the smoke thermometer is through the ice bath method.
Turn on the thermometer and dip its first probe into the ice bath and stir gently. Once the reading is established, take a note of the reading. Check the reading for accuracy and repeat this process again for the second probe.
Using the Calibration Function
- Press and hold the “CAL’ button on the smoke control panel for five seconds. The display should say CAL and the temperature reading should be 0.0°F.
- Use the up and down arrow buttons to make up the difference between the reading you got and the correct reading (which is 32°F) For example, if the reading for the first probe was 34.6°F, then increase by 1.4°F. This will calibrate for probe 1.
- Press the CAL button to save this for probe 1.
- Press and hold the CAL button again to repeat this process for probe 2, again adjusting according to the reading you noted down when you tested the probe.
Maverick ET-733 Calibration
It is actually annoying that you cannot calibrate Maverick thermometers. Still, there are a couple of things you can do though.
- Do an ice bath and boiling water test. This will give you the final word on whether your Maverick is working properly or not. If you are concerned because the Maverick is returning different results to the inbuilt thermometer of your smoker, chances are the in built thermometer on the smoker is wrong, as they are notoriously bad.
- If it does appear that the Maverick ET-733 is returning inaccurate results, then check your warranty. You might be able to get replacement probes or wires.
- A general note to keep in mind: When you clean the probes, make sure you don’t let any water in where the wires meet the probes.
Some Tips to Keep your Thermometer Accurate
- Granted, cooking is a messy business, but try to keep areas where the wiring meets the probes dry.
- The manufacturers will usually provide a range of temperatures within which your thermometer will work. Try not to expose your thermometer to temperatures outside this range. Not only will the results be inaccurate, you will also damage your thermometer.
- When storing a thermometer that has cables attached to the probes, do not kink the cables or wrap them around the probes. The stress caused by the kinking and wrapping could damage the cable.
Summing it up
As we have emphasized in many of our other articles, an accurate thermometer is an invaluable tool in any pitmasters collection. It helps you to make sure that all of your smoked meat is perfectly cooked, whether it is brisket or turkey, knowing its temperature will help you to cook better.
No matter how much you paid for your meat thermometer, if it is not accurate, it is worthless. So, knowing how to test, calibrate and properly care for your thermometer is vital information for any barbecue enthusiast.
If you are in the market for a new smoker check out my guide to the best smokers for beginners and the best pellet grills under $500.
![Best Wood for Smoking Turkey [2022]](https://pitmastering.com/wp-content/uploads/2021/01/Best-wood-for-smoking-turkey-768x434.jpg)